Spring Boot干货系列:(六)静态资源和拦截器处理
前言
本章我们来介绍下SpringBoot对静态资源的支持以及很重要的一个类WebMvcConfigurerAdapter。
正文
前面章节我们也有简单介绍过SpringBoot中对静态资源的默认支持,今天详细的来介绍下默认的支持,以及自定义扩展如何实现。
默认资源映射
Spring Boot 默认为我们提供了静态资源处理,使用 WebMvcAutoConfiguration 中的配置各种属性。
建议大家使用Spring Boot的默认配置方式,提供的静态资源映射如下:
classpath:/META-INF/resources
classpath:/resources
classpath:/static
classpath:/public
在工程里面路径是这样: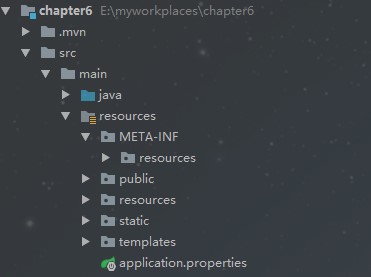
上面这几个都是静态资源的映射路径,优先级顺序为:META-INF/resources > resources > static > public
大家可以自己在上面4个路径下都放一张同名的图片,访问一下即可验证。
还有,你可以随机在上面一个路径下面放上index.html,当我们访问应用根目录http://lcoalhost:8080 时,会直接映射到index.html页面。
对应的配置文件配置如下:
1
2
3
4
# 默认值为 /**
spring.mvc.static-path-pattern=
# 默认值为 classpath:/META-INF/resources/,classpath:/resources/,classpath:/static/,classpath:/public/
spring.resources.static-locations=这里设置要指向的路径,多个使用英文逗号隔开
我们可以通过修改spring.mvc.static-path-pattern来修改默认的映射,例如我改成/dudu/**,那运行的时候访问 http://lcoalhost:8080/dudu/index.html 才对应到index.html页面。
接管Spring Boot的Web配置
如果Spring Boot提供的Sping MVC不符合要求,则可以通过一个配置类(注解有@Configuration的类)加上@EnableWebMvc注解来实现完全自己控制的MVC配置。
当然,通常情况下,Spring Boot的自动配置是符合我们大多数需求的。在你既需要保留Spring Boot提供的便利,有需要增加自己的额外的配置的时候,可以定义一个配置类并继承WebMvcConfigurerAdapter,无需使用@EnableWebMvc注解。
这里我们提到这个WebMvcConfigurerAdapter这个类,重写这个类中的方法可以让我们增加额外的配置,这里我们就介绍几个常用的。
自定义资源映射addResourceHandlers
比如,我们想自定义静态资源映射目录的话,只需重写addResourceHandlers方法即可。
1
2
3
4
5
6
7
8
9
10
11
12
public class MyWebMvcConfigurerAdapter extends WebMvcConfigurerAdapter {
/**
* 配置静态访问资源
* @param registry
*/
public void addResourceHandlers(ResourceHandlerRegistry registry) {
registry.addResourceHandler("/my/**").addResourceLocations("classpath:/my/");
super.addResourceHandlers(registry);
}
}
通过addResourceHandler添加映射路径,然后通过addResourceLocations来指定路径。我们访问自定义my文件夹中的elephant.jpg 图片的地址为 http://localhost:8080/my/elephant.jpg
如果你想指定外部的目录也很简单,直接addResourceLocations指定即可,代码如下:
1
2
3
4
5
public void addResourceHandlers(ResourceHandlerRegistry registry) {
registry.addResourceHandler("/my/**").addResourceLocations("file:E:/my/");
super.addResourceHandlers(registry);
}
addResourceLocations指的是文件放置的目录,addResoureHandler指的是对外暴露的访问路径
页面跳转addViewControllers
以前写SpringMVC的时候,如果需要访问一个页面,必须要写Controller类,然后再写一个方法跳转到页面,感觉好麻烦,其实重写WebMvcConfigurerAdapter中的addViewControllers方法即可达到效果了
1
2
3
4
5
6
7
8
9
10
/**
* 以前要访问一个页面需要先创建个Controller控制类,再写方法跳转到页面
* 在这里配置后就不需要那么麻烦了,直接访问http://localhost:8080/toLogin就跳转到login.jsp页面了
* @param registry
*/
public void addViewControllers(ViewControllerRegistry registry) {
registry.addViewController("/toLogin").setViewName("login");
super.addViewControllers(registry);
}
值的指出的是,在这里重写addViewControllers方法,并不会覆盖WebMvcAutoConfiguration中的addViewControllers(在此方法中,Spring Boot将“/”映射至index.html),这也就意味着我们自己的配置和Spring Boot的自动配置同时有效,这也是我们推荐添加自己的MVC配置的方式。
拦截器addInterceptors
拦截器在我们项目中经常使用的,这里就来介绍下最简单的判断是否登录的使用。
要实现拦截器功能需要完成以下2个步骤:
创建我们自己的拦截器类并实现 HandlerInterceptor 接口
其实重写WebMvcConfigurerAdapter中的addInterceptors方法把自定义的拦截器类添加进来即可
首先,自定义拦截器代码:
1
2
3
4
5
6
7
8
9
10
11
12
13
14
15
16
17
18
19
20
21
22
23
package com.dudu.interceptor;
public class MyInterceptor implements HandlerInterceptor {
public boolean preHandle(HttpServletRequest request, HttpServletResponse response, Object handler) throws Exception {
boolean flag =true;
User user=(User)request.getSession().getAttribute("user");
if(null==user){
response.sendRedirect("toLogin");
flag = false;
}else{
flag = true;
}
return flag;
}
public void postHandle(HttpServletRequest request, HttpServletResponse response, Object handler, ModelAndView modelAndView) throws Exception {
}
public void afterCompletion(HttpServletRequest request, HttpServletResponse response, Object handler, Exception ex) throws Exception {
}
}
这里我们简单实现了根据session中是否有User对象来判断是否登录,为空就跳转到登录页,不为空就通过。
接着,重写WebMvcConfigurerAdapter中的addInterceptors方法如下:
1
2
3
4
5
6
7
8
9
10
11
/**
* 拦截器
* @param registry
*/
public void addInterceptors(InterceptorRegistry registry) {
// addPathPatterns 用于添加拦截规则
// excludePathPatterns 用户排除拦截
registry.addInterceptor(new MyInterceptor()).addPathPatterns("/**").excludePathPatterns("/toLogin","/login");
super.addInterceptors(registry);
}
addPathPatterns("/**")对所有请求都拦截,但是排除了/toLogin和/login请求的拦截。
页面登录关键代码
1
2
3
4
5
6
7
8
9
10
11
12
13
14
15
16
17
18
19
//简单登录操作
$("#doLogin").click(function (e) {
$.ajax({
type : "POST",
url : "/login",
data : {
"userName" : $("#userName").val(),
"password" : $("#password").val()
},
dataType : "json",
success : function(data) {
if (data.result == "1") {
window.location.href ="/learn";
} else {
alert("账号密码不能为空!");
}
}
});
});
控制器代码:
1
2
3
4
5
6
7
8
9
10
11
12
13
14
15
16
17
18
19
20
21
22
23
24
25
26
27
28
29
30
31
32
33
34
35
36
37
38
39
40
41
42
43
44
45
46
47
48
49
50
package com.dudu.controller;
public class LearnController {
/**
*登录操作
**/
(value = "/login",method = RequestMethod.POST)
public Map<String,Object> login(HttpServletRequest request, HttpServletResponse response){
Map<String,Object> map =new HashMap<String,Object>();
String userName=request.getParameter("userName");
String password=request.getParameter("password");
if(!userName.equals("") && password!=""){
User user =new User(userName,password);
request.getSession().setAttribute("user",user);
map.put("result","1");
}else{
map.put("result","0");
}
return map;
}
("/learn")
public ModelAndView index(){
List<LearnResouce> learnList =new ArrayList<LearnResouce>();
LearnResouce bean =new LearnResouce("官方参考文档","Spring Boot Reference Guide","http://docs.spring.io/spring-boot/docs/1.5.1.RELEASE/reference/htmlsingle/#getting-started-first-application");
learnList.add(bean);
bean =new LearnResouce("官方SpriongBoot例子","官方SpriongBoot例子","https://github.com/spring-projects/spring-boot/tree/master/spring-boot-samples");
learnList.add(bean);
bean =new LearnResouce("龙国学院","Spring Boot 教程系列学习","http://www.roncoo.com/article/detail/125488");
learnList.add(bean);
bean =new LearnResouce("嘟嘟MD独立博客","Spring Boot干货系列 ","http://tengj.top/");
learnList.add(bean);
bean =new LearnResouce("后端编程嘟","Spring Boot教程和视频 ","http://www.toutiao.com/m1559096720023553/");
learnList.add(bean);
bean =new LearnResouce("程序猿DD","Spring Boot系列","http://www.roncoo.com/article/detail/125488");
learnList.add(bean);
bean =new LearnResouce("纯洁的微笑","Sping Boot系列文章","http://www.ityouknow.com/spring-boot");
learnList.add(bean);
bean =new LearnResouce("CSDN——小当博客专栏","Sping Boot学习","http://blog.csdn.net/column/details/spring-boot.html");
learnList.add(bean);
bean =new LearnResouce("梁桂钊的博客","Spring Boot 揭秘与实战","http://blog.csdn.net/column/details/spring-boot.html");
learnList.add(bean);
bean =new LearnResouce("林祥纤博客系列","从零开始学Spring Boot ","http://412887952-qq-com.iteye.com/category/356333");
learnList.add(bean);
ModelAndView modelAndView = new ModelAndView("/template");
modelAndView.addObject("learnList", learnList);
return modelAndView;
}
}
这样访问的时候,如果未登录就会跳转到login.html页面,而访问http://localhost:8080/toLogin 和http://localhost:8080/login 不会被拦截。

更多配置可以查看WebMvcConfigurerAdapter的类的API。因其是WebMvcConfigurer接口的实现,所以WebMvcConfigurer的API方法也可以用来配置MVC。
只是实现这个接口的话,要实现所有的方法,这个就尴尬了。
所以还是推荐使用继承WebMvcConfigurerAdapter类来处理。
总结
静态资源跟拦截器在平时项目中经常用到,弄懂如何处理是很有用的。今天就到此为止,下一篇将来介绍一下项目中如何使用日志
标签:
上一篇: Spring Boot干货系列:(五)开发Web应用之JSP篇
下一篇: Spring Boot干货系列:(七)默认日志logback配置解析
